FAQ
Common questions and answers about our IT services.
Identity Provider - IDP
General description of SAML2 WebSSO
The service provides authentication of users which have an electronic idenitity at Mid Sweden University , together with release of attributes pertaining to the authenticated user. The provider of the service/centre of learning is a member of SWAMID, the Swedish identity federation for Research and higher education. The service has been deployed in accordance with SWAMID’s policy and encompassing rules and guidelines which have been laid down by SWAMID.
Policy for personal integrity
The service adheres to the policy for the handling of personal data which has been published by Mid Sweden University in accordance with Swedish law.
The service and limitations of service
Mid Sweden University undertakes to guarantee the availability of the service in accordance with Mid Sweden University’s requirements and expectations. The process for creation, deletion and maintenance of electronic identities at Mid Sweden University is described here . Mid Sweden University follows SWAMID’s recommendations for release of attributes based upon entity categories. Mid Sweden University reserves the right to change the actually released attributes, having communicated such with a service provider, regardless of the recommendations from SWAMID concerning the entity category the service provider has been placed in.
Service and support
Questions and faults regarding Mid Sweden University and it’s SAML2 WebSSO service should be directed to the following local support channels:
Tfn: 010-142 80 00
E-post: itsupport@miun.se
Webb: www.miun.se/itsupport
Contingent liability Mid Sweden University
Regulations for the use of the network and other IT resources at Mid Sweden University.
The IT resources of the university belong to Mid Sweden University and are meant to be used in the framework of the activities of the university. The IT resources may only be used by authorized users. The use of the IT resources may not interfere with existing legislation, the rules of SUNET, the regulations listed in this document or the regulations of the respective activity.
Authorized user
An authorized user is a user who has been authorized to use the IT resources of the university
- The authorization is personal and cannot be transferred to a third person
- The user identity must not be hidden when using the IT resources
- The authorization expires when the employment, studies or other link to Mid Sweden University ends
- The authorization can be withdrawn when the regulations are violated or when Mid Sweden University finds it necessary.
Use of the IT resources at Mid Sweden University
The IT resources of Mid Sweden University must not be used to spread, store or share information in an inappropriate way
- interfering with existing legislation,
- in activities that are not tied to the university,
- for purposes that may harm the university´s name or reputation,
- aiming at the marketing of products or services that are not linked to the university,
- or in any other way interfere with the university´s activities.
Equipment and network
It is not allowed to:
- attach equipment, such as switches, routers, access points or other types of network equipment,
- offer services, such as DHCP, DNS, FTP, HTTP, HTTPS, SMTP using the Mid Sweden University network.
It is allowed to attach private equipment, such as mobiles or computers, to the Mid Sweden University network.
Information security and GDPR
As a user, I am also obliged to
- follow the university´s rules and regulations for information security Information security
- handle personal data in accordance with GDPR GDPR
Consequences/Sanctions
Users who breach the regulations may be suspended from further use of the computers and network of Mid Sweden University, and also suspended from their studies or work, or even fired.
Acts that are considered criminal will be reported to the police. Individuals who breach the above-mentioned regulations are personally liable in terms of consequences, sanctions or compensation.
Links:
SUNET´s regulations:
https://www.sunet.se/policy-for-tillaten-anvandning/
Information security:
https://www.miun.se/informationssakerhet
GDPR:
https://www.miun.se/en/staff/support/general-data-protection-regulation/gdpr-kurs/
Administrator privileges on computer
As an end user, you can apply for temporary administrator privileges by submitting a request via the admin form in the service portal. The request must relate to a work-related need, for example installing software or performing specific administrative tasks.
The request is automatically sent to the user’s immediate manager/head of department for approval. Manager approval is required before the request is forwarded for IT processing and can be implemented.
Administrator privileges are managed through a tool that will be installed on the computer for secure and temporary management of administrative rights.
E-mail on the smartphone does not work after activating MFA
The built in e-mail apps on Android and iPhones has certain problems to handle MFA. Install "Microsoft Outlook" from Play store or App store and use it to read your e-mail from the smartphone.
When is MFA required?
Each time a user attempts to log in externally (not at campus and not connected with vpn) to certain services like to the mail or to the website miun.se, MFA authenication is required. The MFA-session from a device is valid for 14 days.
What is MFA and why is it needed?
Multi-Factor Authentication (MFA) is the use of two or more independent means of evidence (factors) to assert the identity of a user requesting access to an application or service. The most common form of multi-factor authentication is two-factor authentication (2FA), which pairs your first authentication factor (typically something you know like your password) with a second factor of an entirely different kind such as something you have (like your smartphone).
RemoteApp Mac
How to access remote applications at MIUN from Mac
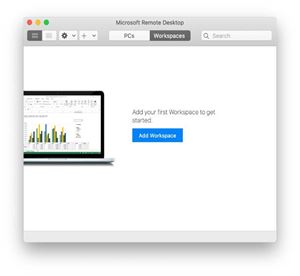
By using Microsoft Remote Desktop you can access remote applications at MIUN.
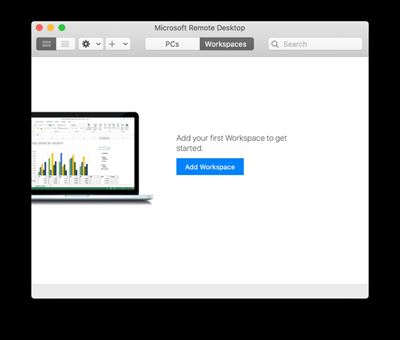
- Start Microsoft Remote Desktop (Install it from Self Service if missing)
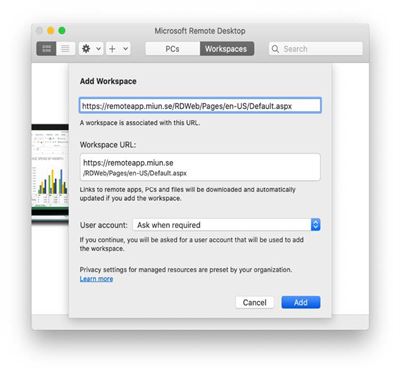
- In Microsoft Remote Desktop Click on Add Workspace
- In the URL field enter the following and then click on Add.
https://remoteapp.miun.se/RDWeb/Feed/webfeed.aspx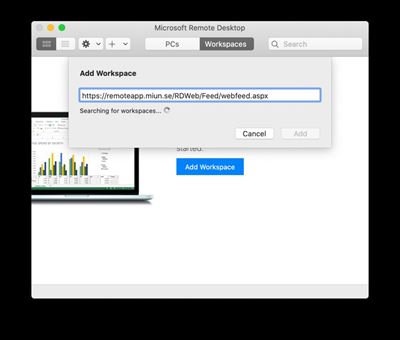

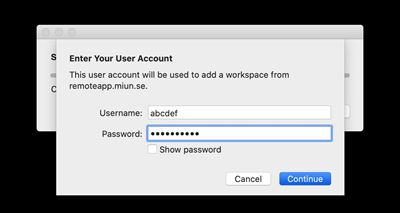
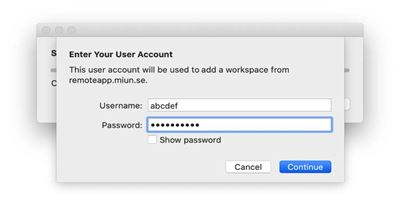
- Enter your credentials and click on Continue.
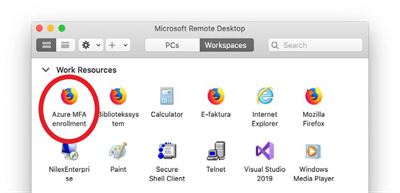
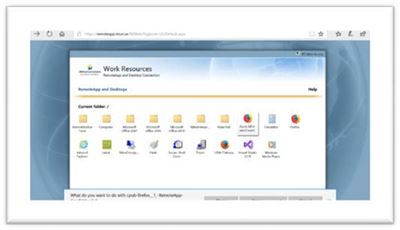
- You will now see your accessible applications. Start the applications by double click.

- Enter your credentials and click on Continue.
- Your remote application starts.
Guide MFA for Mac
Download the guide to print here
Install two-factor verification
To access your accounts more securely, we are introducing an additional security step, two-factor verification, which makes it harder for hackers to break in to your account to access your documents and information. To install it you need your computer and your mobile.
The installation is done in two steps:
- Download and install the Microsoft Authenticator app to your mobile.
- Add your Miun account to your app.
Step 1
- Download and install the app Microsoft Authenticator to your mobile.
- For Apple units: Available in AppStore.

- For Android units: Available in Play Butik.


- Give the app access to your camera to photograph a code, as well as your contacts. Save these settings.
- When the app is installed on the unit you wish to use to log in, select Next and then Next again in the dialog box ”Configurate your account”.
- Select Add account followed by your work or school account.
- The app asks you to scan a QR code you will now generate on your computer.
Step 2
- •Start Microsoft Remote Desktop (Install from Self Service if needed).
- •Click on Add Workspace.
- Type the following address and click Add:
https://remoteapp.miun.se/RDWeb/Feed/webfeed.aspx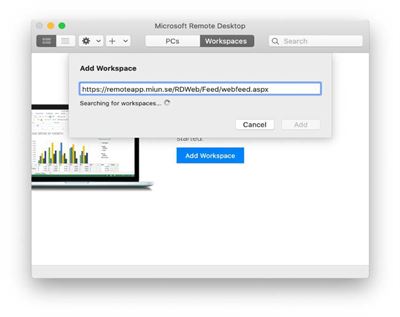
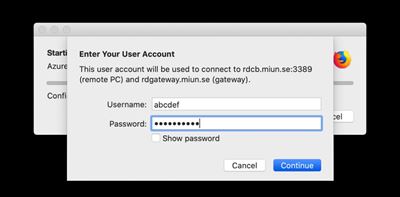
- Enter your login information and click Continue.
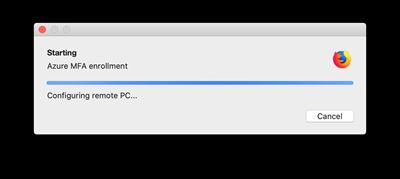
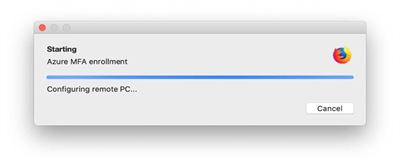
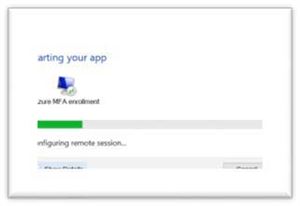
- Here are the apps you can start. Select Azure MFA enrollment.
- Enter your login information again and press Continue.

- A remote desktop will start.
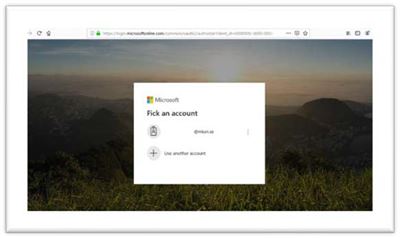
- Select your Miun account or enter your Miun email address if your account does not appear.

- Enter personal\username and password, like when you log in to your computer.
Please note! personal\ must be entered before your user name. Press the right option key and the ? key for \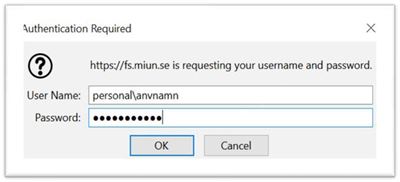
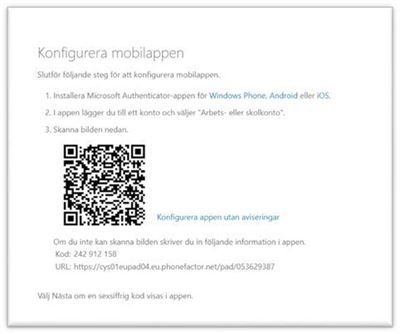
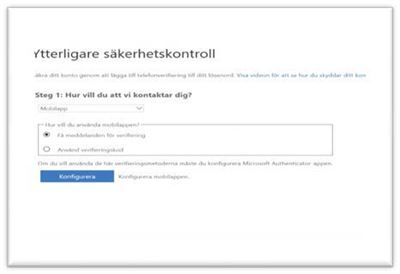
- Select the option Mobile app as well as Receive notifications for verification.
- Select Configurate.

- Scan the QR code using the Microsoft Authenticator app on your mobile.
- Answer on your mobile unit.
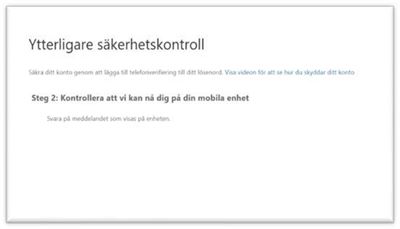
- Add your phone number and approve via the app.
- Please also add your private phone number in case you lose your work mobile.
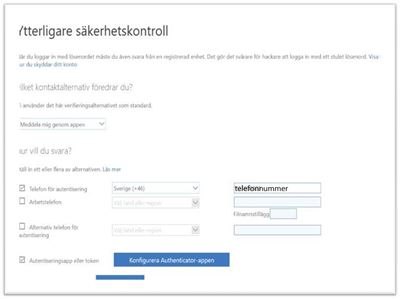
- Click Save and you are done.

Done!
Guide MFA för Windows
Download the guide to print here
Install two-factor verification
To access your accounts more securely, we are introducing an additional security step, two-factor verification, which makes it harder for hackers to break in to your account to access your documents and information. To install it you need your computer and your mobile.
The installation is done in two steps:
- Download and install the Microsoft Authenticator app to your mobile
- Add your Miun account to your app.
Step 1
- Download and install the Microsoft Authenticator app on your mobile.
- Install from AppStore for an Apple unit

- Install from Play Butik for an Android unit

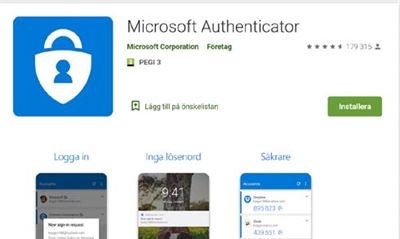
- Give the app access to your camera to photograph a code, as well as your contacts. Save these settings.
- When the app is installed on the unit you wish to use to log in, select Next and then Next again in the dialog box ”Configurate your account”.
- Select Add account followed by your work or school account.
- The app asks you to scan a QR code you will now generate on your computer.
Step 2
You need to follow a guide on your computer to decide how you wish to handle the two-factor verification.
- Follow the pages 4-6 if you have a Miun computer and are located on campus or using VPN
- Follow the pages 7-12 if you are outside of our network and cannot use VPN
To use VPN, click on the network icon next to the time. It looks like a screen or a fan, depending on whether you use a network cable or wifi.
![]()
![]()
When you click on the network icon you will se a menu. Click on vpn.miun.se and connect. Log in using your normal password.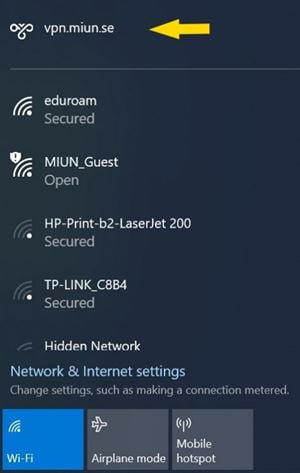
You are now connected via VPN.
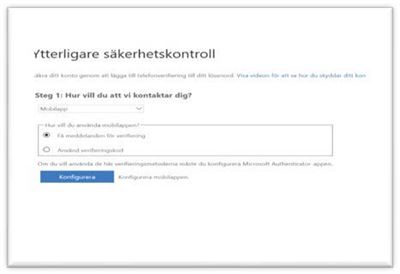
- To generate the QR code you need to scan, go to the webpage https://mfa.miun.se/
- ·Select your Miun account
- Select the option Mobile app as well as Receive notifications for verification.
- Select Configurate.
- Scan the QR code using the Microsoft Authenticator app on your mobile.

- Answer on your mobile unit.

- Add your phone number and approve via the app.
- Please also add your private phone number in case you lose your work mobile.

- Click Save and you are done.

Installation outside of campus
If you work outside of campus and cannot use VPN, you may activate MFA from any Windows computer, as long as it is connected to the internet.
- Go to https://remoteapp.miun.se/
- Click on the link.
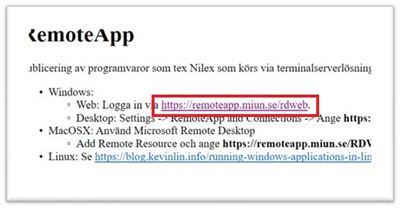
- Click on AzureMFA enrollment.

- Select Open.
- Enter personal\username and password, like when you log in to your computer.
Please note! personal\ needs to be in front of your username.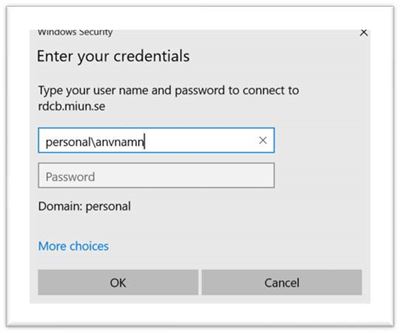
- Select your Miun account, or enter your Miun e-mail address if your account does not appear.
- Enter personal\username and password, like when you log in to your computer.
Please note! personal\ must be entered before your user name.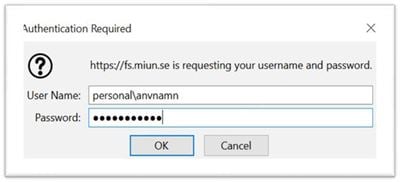
- Select the option Mobile app as well as Receive notifications for verification.
- Select Configurate.
- Scan the QR code using the Microsoft Authenticator app on your mobile.

- Answer on your mobile unit.

- Add your phone number and approve via the app.
- Please also add your private phone number in case you lose your work mobile.
- Click Save and you are done.
You are done!
General
As long as you have an internet connection, VPN allows you to connect to Miun’s network when you are outside the university. This allows you to access many of the Miun systems that are usually not accessible from outside, such as Agresso.
VPN for Mac
VPN for Mac
In order to connect to Miun’s network via VPN, your Mac needs to have an internet connection. After that you can connect to FortiClient VPN
FortiClient VPN
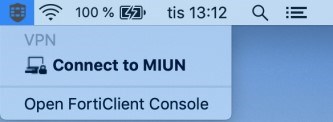
If you have FortiClient installed, it will be visible next to the clock.

Click on the FortiClient icon and select Connect to MIUN.
Enter your Miun username (userab@miun.se or userab1234@miun.se) and the same password you use to log on to your computer and press Enter or click Connect.
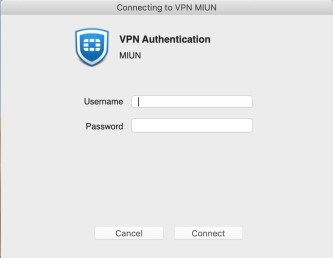
You will now be connected via FortiClient VPN.
VPN for windows
To be able to connect to Miun's network via VPN, your computer first and foremost needs to have an internet connection. After that you can connect to FortClient VPN
FortiClient VPN
You can connect VPN via FortiClient in two ways, either when you log in to the computer, or when you are already logged in to the computer. Below we describe the two different ways.
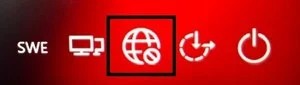
1. Connect the FortiClient VPN when logging in to the computer. This requires that the computer already has an internet connection either via network cable or WiFi.
- Start your computer and connect to Internet by clicking on the logo in shown in the picture below. There is another logo if you are connected by wire.
-
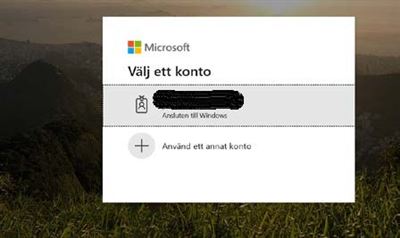
On your login screen, select Sign-in options.
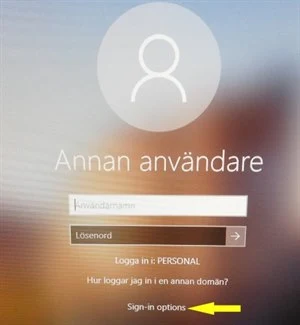
Here you can choose whether you want to log in with or without VPN.
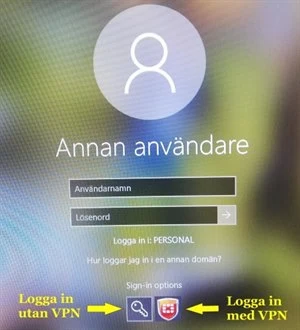
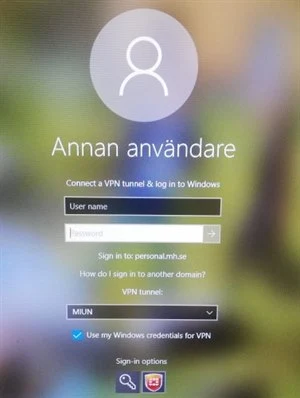
- Click on the FortiClient logo and then enter your username (userab@miun.se or userab1234@miun.se) and password just like when you log in as usual, press Enter and the computer will first connect to the VPN and then log you in the usual way.
2. Connect your FortiClient VPN when you are already logged on to the computer
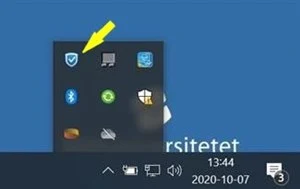
- If you have FortiClient installed, it will appear in the system tray next to the clock.
- Click the FortiClient icon and select Connect to MIUN.
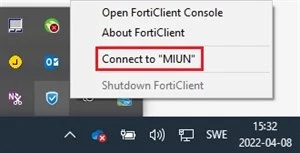
- Enter the same username (userab@miun.se or userab1234@miun.se) and password that you use to log in to the computer and press Enter or click Connect.
- If everything works as it should, you will be connected via FortiClient VPN.